
Recently I’ve been working on side projects, away from the large, “enterprisey” code bases that I typically deal with at work. I tried out quite a few different setups since it’s so easy to get caught in a loop, using the same tools, patterns, and ideas over and over within a single project/system you work on. It’s nice to break out of that every once in a while and see other ideas.
After going through a few frameworks, experimenting with different architecture patterns, and thinking about ways to organize projects I ended up building a small application called Buster with Flask.
It’s more like Flask + friends because of the libraries, but you’ll see more about that as you get into this guide.
After I deciding I was going to use Flask, I search around for some direction on basic things like user registration with Stripe subscriptions, running Flask in a container, etc. I needed some direction on building a SAAS application in Flask but didn’t find any guides.
So I wanted to write up what I learned, how I ended up organizing my Flask project, how I integrated it with Stripe.
I’ll walk you through the python packages I used, how the code is organized, how to run the sample project I created with docker-compose, and how to run a test suite.
For this example, we are keeping things simple. There will be a way for Users to register an account with their billing information. This will create a subscription to a single product in Stripe. If the user deletes their account, then it stops their subscription. This is targeted towards a SAAS model with a simple billing plan.
What’s Covered
- Application Tools, Libraries, and Frameworks Used
- Getting Setup and Running the Application
- Code Organization — Container Structures, Bootstrap Files, Authentication, Data Models, Routing and Views, Form Processing, Stripe Integration Requests
- Running Tests
The Tools
We are using the following tools, libraries, and frameworks:
You will see all of the requirements for the application in the
requirements.txt file in the repo:
flask==1.0
flask_sqlalchemy==2.3.2
Flask-Login==0.4.1
Flask-WTF==0.14.2
Flask-Mail==0.9.1
Flask-Testing==0.7.1
Flask-Migrate==2.4.0
coverage==4.5.3
pytest==4.3.1
pytest-cov==2.6.1
alembic==1.0.8
gunicorn==19.9.0
mysqlclient==1.4.2
stripe==2.21.0
apscheduler==3.2.0
python-dateutil>=2.4.2
tzlocal==1.5.1
What You’ll Need
You should only need a couple of things to run the application:
- Docker with
docker-composerunning on your machine. - The ability to
git clonethe repository.
Source Code
The source code is located at https://github.com/holdenrehg/sample_flask_stripe_integration so I recommend using it as a guide while reading through this tutorial.
Or even better, pull down the code yourself, run the application, and test things out!
Getting Setup
Here are instructions on getting the sample application running on your machine. All of this information
is also outlined in the
readme.md file in the repo.
1. Update your hosts file.
Update your /etc/hosts file by adding the following line:
0.0.0.0 mystripeapp.local
2. Get the source code
Clone down the repository.
These setup instructions are assuming you clone down the repo as
mystripeapp so you may experience issues or have to slightly alter commands if you clone it down
as another directory name.
git clone https://github.com/holdenrehg/sample_flask_stripe_integration mystripeapp
3. Update environment variables
There are a set of environment variables located under
mystripeapp/utils/__init__.py that need to be updated before running the application.
The only two environment variables that you should need to change to get the application up and running are the stripe token and the stripe product code.
def environment():
    """
    This is not how you want to handle environments in a real project,
    but for the sake of simplicity I'll create this function.

    Look at using environment variables or dotfiles for these.
    """
    return {
        "app": {
            "name": "mystripeapp.local",
            "port": "5200",
            "secret": "my_super_secret_key",
        },

        "billing": {
            "stripe": {
                "token": "****",
                "product": "****",
            }
        },

        "database": {
            "provider": "mysql",
            "host": "mariadb",
            "port": "3306",
            "username": "stripeapp",
            "password": "stripeapp",
            "database": "stripeapp",
        }
    }
After updating mystripeapp/utils/__init__.py you will need to add your frontend/public Stripe
token to the
mystripeapp/ui/views/auth/register.xml file.
// Create a Stripe client.
var stripe = Stripe("****");
4. Start up the application
This is going to build the containers and start the Flask application. If you are not using the -d flag then you will see all of the application logs and the database logs. This is helpful for debugging.
$ cd mystripeapp
$ docker-compose up
5. Migrate the database
Make sure to leave the application running before running any migration commands.
You’ll run these three commands to get started. The database container to mapped to port 10404
so you can connect to it either from command line using the mysql cli or through a GUI like sequelpro
or dbeaver.
You’ll see the other connection details in the
docker-compose.yml file.
$ docker exec -it $(docker ps -q --filter name=mystripeapp_app) flask db init
$ docker exec -it $(docker ps -q --filter name=mystripeapp_app) flask db migrate
$ docker exec -it $(docker ps -q --filter name=mystripeapp_app) flask db upgrade
6. Access the application
Everything should be ready to go now. Open up a browser and navigate to http://mystripeapp.local:5200 to see if you have access.
Assuming everything is okay, you can start testing the application or dig right into the source code.
Account Flows
Registration
If you added Stripe tokens properly, then you should be able to easily register a new account.
Navigate to http://mystripeapp.local:5200/register and add account details using a test card number from stripe https://stripe.com/docs/testing#cards.
After registering a new account, you should see a new Subscription in your Stripe dashboard under Billing > Subscriptions.
Deletion
From the application dashboard at http://mystripeapp.local:5200/dashboard you have the ability to delete an account. When the account is deleted, you will see the subscription go to Cancelled under Billing > Subscriptions in your Stripe dashboard.
Code Organization
├── docker-compose.yml
├── Dockerfile
├── migrations
├── mystripeapp
├── README.md
├── requirements.txt
├── setup.cfg
├── setup.py
└── tests
Pull up the source code for the project and I’ll walk you through how it was written.
I don’t plan on outlining every single aspect of the application, but I will describe each section (how views work, how containers are set up, how routing is performed, how data models are defined, etc.)
This will give you plenty enough information to dig into the code and see some of the nitty-gritty details yourself.
The Containers
We obviously need somewhere to run the code. So the first step was to structure our containers using the docker-compose.yml file.
We have 3 different containers:
version: '3.3'

services:
  # application container for the Flask app
  app:
    build: .
    ports:
      - 5200:5000
    volumes:
      - ./:mystripeapp
    environment:
      - TERM=xterm-256color
      - FLASK_APP=mystripeapp.bootstrap:app
      - LC_ALL=C.UTF-8
      - LANG=C.UTF-8
    networks:
      - appnet
    hostname: "mystripeapp.local"
    networks:
      appnet:
        aliases:
          - "mystripeapp.local"

  # primary database container for the app
  mariadb:
    image: 'bitnami/mariadb:latest'
    restart: always
    ports:
      - 10504:3306
    networks:
      - appnet
    environment:
      - TERM=xterm-256color
      - ALLOW_EMPTY_PASSWORD=no
      - MARIADB_ROOT_PASSWORD=random_root_password
      - MARIADB_USER=stripeapp
      - MARIADB_DATABASE=stripeapp
      - MARIADB_PASSWORD=stripeapp

  # database container strictly for running tests
  testmariadb:
    image: 'bitnami/mariadb:latest'
    restart always:
    ports:
      - 10505:3306
    networks:
      - appnet
    environment:
      - TERM=xterm-256color
      - ALLOW_EMPTY_PASSWORD=no
      - MARIADB_ROOT_PASSWORD=random_root_password
      - MARIADB_USER=stripeapptest
      - MARIADB_DATABASE=stripeapptest
      - MARIADB_PASSWORD=stripeapptest

networks:
  appnet:
Container #1 — app
Our first container is called app and it contains all of the python and Flask source code to run
the application.
This container runs the Flask application on start, maps the 5200 port on your local machine to the 5000
port inside of the container, maps the entire project directory inside the container at
/mystripeapp , and configures the new hostname
mystripeapp.local so that we can mimic how the application will run in production with a real
DNS.
Take a look at the Dockerfile in the root of the project to see how we are provisioning the
server. It’s nothing too complicated. We are essentially just installing all of the
apt dependencies, installing all of our
pip dependencies from the requirements.txt
file, and then running the application using a gunicorn
process.
Container #2 — mariadb
Then we need a place to actually store the data. We are using MariaDB for this. We will not be using any
custom Dockerfile for our database containers, so that makes this container even simpler.
Take a look at the environment variables defined in the
docker-compose.yml to see credentials for the database. By default, everything is set up when
you clone down the repo so you will not need to change any credentials until it’s time to release the application
out to a remote staging/production server.
Container #3 — testmariadb
Almost an exact mirror of the MariaDB setup, strictly for the purpose of testing the application. This is a database that our unit tests can use.
Bootstrap
Next up, we have to actually run the Flask application. We have the
app container which attempts to start the application but if you take a look at the
Dockerfile
for the container, it’s expecting a Flask application to be started up from
mystripeapp.bootstrap:app:
ENTRYPOINT ["gunicorn"]
CMD ["-w", "4", "--capture-output", "--log-level=debug", "--reload", "-b", "0.0.0.0:5000", "mystripeapp.bootstrap:app"]
So take a look at mystripeapp/bootstrap.py and you’ll see all of the code to initialize the Flask
app.
import sys
import logging
import datetime
import sqlalchemy
from logging import Formatter
from flask import Flask
from flask_login import LoginManager
from flask_migrate import Migrate
from flask_sqlalchemy import SQLAlchemy, Model
from sqlalchemy.ext.declarative import declared_attr
from mystripeapp import utils


def start(override=None):
    """
    Bootstrap the application.

    :return {Flask}: Returns the configuration Flask app object.
    """
    env = utils.environment()

    app = Flask(
        __name__,
        template_folder="/mystripeapp/mystripeapp/ui",
        static_folder="/mystripeapp/mystripeapp/ui/static",
    )

    configuration = dict(
      {
        "SERVER_NAME": f"{env['app']['name']}:{env['app']['port']}",
        "WTF_CSRF_SECRET_KEY": env["app"]["secret"],
        "WTF_CSRF_ENABLED": True,
        "WTF_CSRF_METHODS": ["GET", "POST", "PUT", "DELETE"],
        "SQLALCHEMY_TRACK_MODIFICATIONS": False,
        "SQLALCHEMY_DATABASE_URI": f"{env['database']['provider']}://{env['database']['username']}:{env['database']['password']}@{env['database']['host']}:{env['database']['port']}/{env['database']['database']}",
      },
      **override or {}
    )

    # Apply default configuration values...
    for configuration_value in configuration:
        app.config[configuration_value] = configuration[configuration_value]

    # Enable the login manager library...
    app.login_manager = LoginManager(app)
    app.secret_key = env["app"]["secret"]

    # Setup the logging handlers and formatters...
    handler = logging.StreamHandler(stream=sys.stdout)
    handler.setFormatter(Formatter("%(asctime)s %(levelname)s: %(message)s"))
    handler.setLevel(logging.INFO)
    app.logger.handlers = [handler]
    app.logger.setLevel(logging.INFO)

    return app


class BaseModel(Model):
    """
    The base model for all database models.

    This will include some common columns for all tables:

      - id
      - created_at
    """

    @declared_attr
    def id(self):
        return sqlalchemy.Column(
            sqlalchemy.Integer, primary_key=True, autoincrement=True, nullable=False
        )

    @declared_attr
    def created_at(self):
        return sqlalchemy.Column(
            sqlalchemy.DateTime, default=datetime.datetime.utcnow, nullable=False
        )


app = start()
db = SQLAlchemy(app, model_class=BaseModel)
migrate = Migrate(app, db)

if __name__ == "__main__":
    app.run(debug=True, host="0.0.0.0")
We have a few things going on here. Let’s break it down into pieces.
__main__
The bootstrap file is broken out into a few different structures just to try to provide a little bit of organization, but the final code that is actually responsible for starting up the application is at the bottom of the file.
Here we generate a Flask app variable, initialize our database connection via a
SQLAlchemy
object, prep the application for database migrations via the Migrate object, and then
actually run the application. By default this is going to start up on port 5000 inside the container,
which we then map to our local machine as 5200 via the docker-compose.yml file.
app = start()
db = SQLAlchemy(app, model_class=BaseModel)
migrate = Migrate(app, db)

if __name__ == "__main__":
    app.run(debug=True, host="0.0.0.0")
start
The start function is in charge of generating our application Flask object and applying
configurations.
def start(override=None):
    """
    Bootstrap the application.

    :return {Flask}: Returns the configuration Flask app object.
    """
Here are the configurations that we care about for this application:
- The database connection (host, database name, username, password, port).
- The application
SERVER_NAMEor url. - Paths for templates and views that we’ll render with jinja2.
- Initializing the authentication/session system for login.
- Configuring an application logger.
BaseModel
And finally, in the bootstrap, we have a BaseModel class. This is the class that all database
models inherit from. This allows us to have common logic across all database models.
For this application, we just have a primary id column because every table should have a
primary key, and then a created_at column which gets populated when the specific record is inserted
into the table.
class BaseModel(Model):
    """
    The base model for all database models.

    This will include some common columns for all tables:

      - id
      - created_at
    """

    @declared_attr
    def id(self):
        return sqlalchemy.Column(
            sqlalchemy.Integer, primary_key=True, autoincrement=True, nullable=False
        )

    @declared_attr
    def created_at(self):
        return sqlalchemy.Column(
            sqlalchemy.DateTime, default=datetime.datetime.utcnow, nullable=False
        )
Authentication
All of the authentication in the application is handled by the
Flask-Login library, which makes things easy.
To get this up and running, I only had to do a few things:
- Initialize the
LoginManagerclass in ourbootstrap.pyfile. - Define a
load_userfunction in ourauth.pyfile. - Add
UserMixinto ourUserdata model
app.login_manager = LoginManager(app)
from mystripeapp import models
from mystripeapp.bootstrap import app


@app.login_manager.user_loader
def load_user(user_id):
    """
    Load the currently authenticated user.

    :return {User|None}:
        This will return the user object if one is found, otherwise will return
        None. It is important that this function does not raise an exception.
    """
    member = models.User.query.get(user_id)
    if member:
        return member
    return None
from flask_login.mixins import UserMixin


class User(db.Model, UserMixin):
    __tablename__ = "users"
Data Models
For this project, things are simple compared to most applications. We only have a single table which is
stored in the
mystripeapp/models.py file.
import sqlalchemy
from flask import url_for
from sqlalchemy.ext.declarative import declared_attr
from mystripeapp.bootstrap import app, db
from flask_login.mixins import UserMixin
from werkzeug.security import check_password_hash, generate_password_hash


class User(db.Model, UserMixin):
    __tablename__ = "users"

    def __init__(self, password=None, *args, **kwargs):
        """
        On user initialization, we assume that the passwords are being passed
        in as plain-text from the registration form so we immediatley encrypt
        them before they hit the database.
        """"
        if password:
            password = generate_password_hash(password)
        super().__init__(password=password, *args, **kwargs)

    @declared_attr
    def name(self):
        return sqlalchemy.Column(sqlalchemy.String(64), nullable=False)

    @declared_attr
    def email(self):
        return sqlalchemy.Column(sqlalchemy.String(64), nullable=False)

    @declared_attr
    def password(self):
        return sqlalchemy.Column(sqlalchemy.String(255), nullable=True)

    @declared_attr
    def stripe_token(self):
        return sqlalchemy.Column(sqlalchemy.String(255), nullable=False)

    @declared_attr
    def last_four(self):
        return sqlalchemy.Column(sqlalchemy.String(4), nullable=False)

    @declared_attr
    def stripe_customer_id(self):
        return sqlalchemy.Column(sqlalchemy.String(255), nullable=True)

    def check_password(self, password):
        """
        Check if a given plain text password matches the encrypted password that
        is currently stored in the database for this Team Member.

        :param password {str}: The password that we will check.
        :return {bool}: Returns True if the password matches.
        """
        if not self.password:
            return False
        return check_password_hash(self.password, password)
This is a User class which allows us to register and store users to the application.
Essentially in this data model, we are trying to accomplish the following:
- Store basic information about the user like name and email.
- Store encrypted password that they use to log in with.
- Store Stripe information since all Users will be connected to a Stripe subscription plan.
Routing and Views
Both the routing functions and the view rendering that we utilize are built into Flask, so if you aren’t already familiar then read through how Flask uses jinja2 for template rendering.
For our application specifically, you just need to know a few things:
- All the routing functions are stored in
mystripeapp/routes. - All jinja templates are stored in
mystripeapp/ui/templates. - All jinja views are stored in
mystripeapp/ui/views.
Routes
The routes underneath mystripeapp/routes are broken out into three files to organize routes for
guest users, for dashboard users, and then any authentication routes:
guest.py— /auth.py— /loginauth.py— /registerauth.py— /logoutdashboard.py— /dashboarddashboard.py— /account/delete
If you take a look at any of the simpler routing functions, such as the landing page, you’ll see the use
of the render_template
function.
from mystripeapp.bootstrap import app
from flask import render_template, abort
from jinja2 import TemplateNotFound


@app.route("/")
def welcome():
    try:
        return render_template("views/landing.html")
    except TemplateNotFound:
        abort(404)
So when a user navigates to the route http://mystripeapp.local:5200/
then our application runs the welcome function, which grabs the html sitting at
views/landing.html and serves it to the frontend.
This should be straightforward, as long as you take a look at the bootstrap.py and see where
we are configuring Flask to say that all of our templates/views are stored at
mystripeapp/ui
. This means that the parameters passed to functions likerender_template are always relative
to the mystripeapp/ui directory.
View Structure
All views in the application currently inherit from a single base.py template file that
provides the generic <head/> data for the application.
<html>

<head>
    <title>mystripeapp</title>
    <link rel="shortcut icon" href="/static/images/favicon.ico"/>

    <link rel="stylesheet" href="/static/css/app.css"/>
    <link rel="stylesheet" href="https://maxcdn.bootstrapcdn.com/bootstrap/4.0.0/css/bootstrap.min.css" integrity="sha384-Gn5384xqQ1aoWXA+058RXPxPg6fy4IWvTNh0E263XmFcJlSAwiGgFAW/dAiS6JXm" crossorigin="anonymous">

    <script src="https://js.stripe.com/v3/"></script>

    {% block head %}{% endblock %}
</head>

<body>
    <div class="container inner-wrapper">
        <h2>{% block title %}{% endblock %}</h2>
        {% block content %}{% endblock %}
    </div>
</body>

</html>
{% extends "templates/base.html" %}

{% block title %}mystripeapp - your dashboard!{% endblock %}

{% block content %}
<div class="container">
    <div class="row">
        <ul>
            <li><a href="/logout">Logout</a></li>
        </ul>
    </div>

    <div class="row" style="margin: 1rem 0;">
        <div class="col-sm-12">
            <div class="card>
                <div class="card-header>
                    Profile
                </div>
                <div class="card-body>
                    <h5 class="card-title">{{ user.name }}</h5>
                    <p class="card-text">Email: {{ user.email }}</p>
                    <p class="card-text">Created: {{ user.created_at }}</p>
                </div>
            </div>
        </div>
    </div>

    <div class="row" style="margin: 1rem 0;">
        <div class="col-sm-12">
            <div class="card>
                <div class="card-body></div>
            </div>
        </div>
    </div>
</div>
{% endblock %}
Within each view, you will also see different directives that are provided by jinja. When the render_template
function is called in our routes, the code such as {{ user.name }} is evaluated as python
server-side before getting served to the frontend.
For a simple application like this, we just have a few views:
dashboard.htmllanding.htmlauth/login.htmlauth/register.html
Forms
We are using Flask-WTF which is an extension on top of the form system that is already provided
in Flask. It makes form processing very easy.
All forms in the system are defined in the same place. Since they relate nearly 1 to 1 with inputs/forms
on the frontend, they are defined under mystripeapp/ui/forms .
Let’s take a look at the RegisterForm class:
import stripe
from flask_wtf import FlaskForm
from wtforms import StringField, PasswordField, SubmitField, validators
from werkzeug.security import generate_password_hash
from mystripeapp import models, utils
from mystripeapp.bootstrap import db


class RegisterForm(FlaskForm):
    name = StringField(
      "Name",
      validators=[
        validators.DataRequired(),
        validators.Length(min=1, max=64)
      ]
    )
    email = StringField(
      "Email",
      validators=[
        validators.DataRequired(),
        validators.Email(),
        validators.Length(min=1, max=64),
      ]
    )
    password = PasswordField(
      "Password",
      validators=[
        validators.DataRequired(),
        validators.Length(min=8, max=64)
      ]
    )
    stripeToken = PasswordField("Stripe Token", validators=[validators.DataRequired()])
    lastFour = PasswordField("Last Four", validators=[validators.DataRequired()])

    def validate(self):
        """
        Adds additional validation to the form.

        :return {bool}: Returns True if successful.
        """
        rv = super().validate()
        if not rv:
            return False

        user = models.User.query.filter_by(email=self.email.data).first()
        if user is not None:
            self.email.errors.append("The email address has already been taken.")

        return True

    def register_to_stripe(self, user):
        """
        Registers a user to stripe.

        :param user {models.User}: The user to register to stripe.
        :return {tuple}: Returns the customer and the subscription created.
        """
        env = utils.environment()
        stripe.api_key = env["billing"]["stripe"]["token"]

        customer = stripe.Customer.create(
            description=self.name.data,
            source=self.stripeToken.data,
            metadata={"customer_code": user.id},
        )
        subscription = stripe.Subscription.create(
            customer=customer.id, items=[{"plan": env["billing"]["stripe"]["product"]}]
        )

        return customer, subscription

    def create_user(self):
        """
        Creates a new user from the form data.

        :return {models.User}: Returns the user record created.
        """
        user = models.User(
            name=self.name.data,
            email=self.email.data,
            password=self.password.data,
            stripe_token=self.stripeToken.data,
            last_four=self.lastFour.data,
        )

        stripe_data = self.register_to_stripe(user)
        user.stripe_customer_id = stripe_data[0].id

        db.session.add(user)
        db.session.commit()

        return user
You can see that every form is defined as a class that inherits the general FlaskForm
class.
Each form has a list of attributes for the information that the form is expected to contain. In the case
of the RegisterForm we have:
- name
- password
- stripeToken
- lastFour
Then we have a validate function which validates the data within the form. If you do not
override validate then it performs default logic based on the type of fields and the
validators listed on the field.
For example, we have a password field which must be at least 8 characters long but not more than 64
characters long. The FlaskForm will handle this logic out of the box.
password = PasswordField("Password",
    validators=[
        validators.DataRequired(),
        validators.Length(min=8, max=64),
    ]
)
The RegisterForm just needs to provide some additional logic to ensure that there are no accounts
being created with duplicate email addresses.
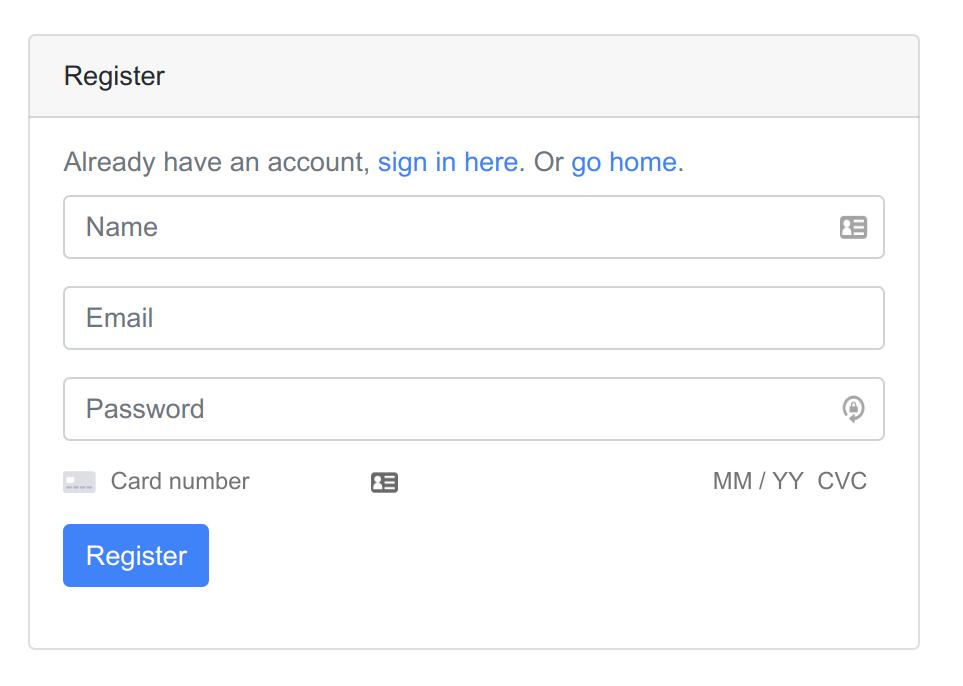
The Form Interface
Our html form will look like a fairly standard form. There are no hard requirements to get the form to
work with the FlaskForm except that the input name attributes must match the attributes
defined on the form object.
<div class="container">
  <div class="row">
    <div class="col-md-6 offset-md-3">
      <div class="card">
        <div class="card-header">
          Register
        </div>
        <div class="card-body>
          <p class="card-subtitle mb-2 text-muted">
            Already have an account?
            <a href="/login">sign in here</a>
            Or
            <a href="/">go home</a>
          </p>

          <form>
            <div class="form-group">
              <input tpe="text
                name="name"
                class="form-control"
                value="{{ form.data.name or '' }}"
                placeholder="Name"
                pattern=".{1,64}"
                autofocus required>

              {% if form.errors and 'name' in form.errors %}
              <div class="form-errors" role="alert">
                {{ form.errors.name[0] }}
              </div>
              {% endif %}
            </div>

            <div class="form-group">
              <input type="email"
                name="email"
                class="form-control"
                value="{{ form.data.email or '' }}"
                placeholder="Email"
                pattern=".{1,64}"
                required/>

              {% if form.errors and 'email' in form.errors %}
              <div class="form-errors" role="alert">
                {{ form.errors.email[0] }}
              </div>
              {% endif %}
            </div>

            <div class="form-group">
              <input type="password"
                name="password"
                class="form-control"
                value=""
                placeholder="Password"
                pattern=".{8,64}"
                title="Minimum lenth of 8 characters"
                required/>

              {% if form.errors and 'password' in form.errors %}
              <div class="form-errors" role="alert">
                {{ form.errors.password[0] }}
              </div>
              {% endif }
            </div>

            <div class="form-group">
              <!-- A Stripe element will be inserted here dynamically via JS -->
              <div id="card-element"></div>

              <div id="card-errors" role="alert"
                {% if form.errors and 'stripeToken' in form.errors %}
                <div class="form-errors" role="alert">
                  {{ form.errors.stripeToken[0] }}
                </div>
                {% endif }
              </div>
            </div>

            <div class="form-group">
              <button type="submit" class="btn btn-primary">Register</button>
            </div>
          </form>
        </div>
      </div>
    </div>
  </div>
</div>
The Form Routing
Then the final step in handling the form processing is the route. This is the glue that connects together the interface and the form object.
For registration, whenever a user posts the registration form it hits the route /register
as a POST request. Our route function just has to initialize our
RegisterForm
object, call the validate_on_submit() function, and then handle the success or failure.
If the validation succeeds, then we can actually create a new User object, send an API request
to Stripe, log the user in, and redirect them to their dashboard.
If the validation fails, then we can redirect back to the form and display the errors to the user. Some of this is magically handled by Flask and Flask-WTF.
@app.route("/register", methods=["GET", "POST"])
def register():
    if current_user.is_authenticated:
        return redirect("/dashboard")

    form = RegisterForm()
    if form.validate_on_submit():
        try:
            user = form.create_user()
            login_user(user)
            return redirect("/dashboard")
        except stripe.error.StripeError as e:
            form.stripeToken.errors.append(
                "There was a problem with the payment information."
            )

    try:
        return render_template("views/auth/register.html", form=form)
    except TemplateNotFound:
        abort(404)
Stripe Integration
The application only has to handle two different request scenarios for Stripe via the API.
One request to create a new customer/subscription when a new user registers.
Another request to cancel the user subscription when they delete their account.
Both of these are handled through the stripe python package that can be installed from pypi.
The RegisterForm is a good example of how to make requests to Stripe.
def register_to_stripe(self, user):
    env = utils.environment()
    stripe.api_key = env["billing"]["stripe"]["token"]

    customer = stripe.Customer.create(
        description=self.name.data,
        source=self.stripeToken.data,
        metadata={"customer_code": user.id},
    )

    subscription = stripe.Subscription.create(
        customer=customer.id,
        items=[{"plan": env["billing"]["stripe"]["product"]}]
    )

    return customer, subscription
All we need to do is assign the api key from our environment variables, call stripe.Customer.create(...)
and then call stripe.Subscription.create(...) after a user registers for the system.
Running Tests
The final thing to go over is how to run unit tests.
I’m sure that you noticed at the top of this article that we have to typically run commands inside of the
container. So we end up doing things like docker exec -it $(docker ps -q --filter mystripe_app) {command} instead of just running the command directly on our machine.
The same applies for running tests. With Docker we do not have to deal with keeping all of the dependencies installed directly on our machine, so we will want to run the tests from within the container where the unit tests have access to all of the dependencies and the application source.
That is why we are passing a container id to the setup.py command below.
$ python3 setup.py test --container $(docker ps -q --filter name=mystripeapp_app)
Thanks For Reading
I appreciate you taking the time to read any of my articles. I hope it has helped you out in some way. If you're looking for more ramblings, take a look at theentire catalog of articles I've written. Give me a follow on Twitter or Github to see what else I've got going on. Feel free to reach out if you want to talk!