
Introduction
Testing with Odoo, in any version, is not 100% straight forward. There are some different tricks and requirements that aren’t always made clear.
So I wanted to write up everything that my team and I at Blue Stingray have learned about Odoo testing over the last few years. We’ve luckily been able to learn a ton.
This is not an explanation on what to test. There are plenty of great articles and books out there for what should you be testing, and maybe I’ll write up a summary of those one day. But for now, this is strictly an explanation on how to organize, write, and run some example tests in Odoo.
I will try to thoroughly cover:
- Setting up a module for tests
- Writing a test within the Odoo framework boundaries
- Running your Odoo / module test suite
Requirements
What do you need?
- A running instance of Odoo.
- A custom Odoo module (I’ll provide a sample).
I will be referencing Odoo 12, but Odoo 9 to 12 have pretty similar testing frameworks. There were no huge changes between recent versions.
Also, you may want to check out a Simple Introduction To Docker Development In Odoo since I will be referencing some Docker commands.
Module Structure
Let’s create a sample module. For reference, all sample code is in a repository at https://github.com/holdenrehg/sample_test_module.
test_module
├── doc
├── helpers
├── models
├── security
├── static
├── tests
├── __manifest__.py
├── __init__.py
├── init.xml
└── readme.md
I’m creating a sample module called test_module which will contain all of my sample tests and
code. You will see quite a few directories above, many just “standards” introduced by Odoo in general, but
the most important directory will be tests.
The Tests Directory
test_module/tests/
├── unit
│   ├── test_tweeter_helper.py
│   ├── test_twitter_tweet_model.py
│   ├── test_string_helper.py
│   ├── test_twitter_settings_model.py
│   └── __init__.py
└── __init__.py
You can organize your tests directory however you would like, but I often will try to break up different
types of tests. In the example above you can see that we have tests/unit
for all of our unit tests. Maybe if we kept building this out, we would introduce
tests/integration,
tests/security, etc.
Some Sample Models and Helpers
Also inside of our module, we have 2 models and 2 helpers to use as examples for writing some tests.
Again, this is just convention to have a models folder and a helpers
folder for Odoo modules, but as long as your __init__ files are properly importing files you can
organize your module however you would like.
test_module/helpers
├── string.py
├── tweeter.py
└── __init__.py
test_module/models/
├── twitter
│   ├── tweet.py
│   ├── settings.py
│   └── __init__.py
└── __init__.py
Module Files
Let’s dig into the contents of some of these sample files that I’ve written for you. I’m not quite going
to get into the tests folder until the section below.
__manifest__.py
Because we are using 12.0 we require a manifest file. If we were looking at 9.0 and back we may have an __openerp__.py file in the root of our module, but the general contents will be the same.
# -*- coding: utf-8 -*-
# noinspection PyStatementEffect
{
    'name': 'Sample Testing Module',
    'category': 'Testing',
    'version': '12.0.0',
    'author': 'Holden Rehg',

    # |-------------------------------------------------------------------------
    # | Dependencies
    # |-------------------------------------------------------------------------
    # |
    # | References of all modules that this module depends on. If this module
    # | is ever installed or upgrade, it will automatically install any
    # | dependencies as well.
    # |

    'depends': ['web'],

    # |-------------------------------------------------------------------------
    # | Data References
    # |-------------------------------------------------------------------------
    # |
    # | References to all XML data that this module relies on. These XML files
    # | are automatically pulled into the system and processed.
    # |

    'data': [

        # Security Records...
        'security/ir.rule.csv',
        'security/ir.model.access.csv',

        # General/Data Records...
        'init.xml',
    ],

    # |-------------------------------------------------------------------------
    # | Demo Data
    # |-------------------------------------------------------------------------
    # |
    # | A reference to demo data
    # |

    'demo': [],

    # |-------------------------------------------------------------------------
    # | Is Installable
    # |-------------------------------------------------------------------------
    # |
    # | Gives the user the option to look at Local Modules and install, upgrade
    # | or uninstall. This seems to be used by most developers as a switch for
    # | modules that are either active / inactive.
    # |

    'installable': True,

    # |-------------------------------------------------------------------------
    # | Auto Install
    # |-------------------------------------------------------------------------
    # |
    # | Lets Odoo know if this module should be automatically installed when
    # | the server is started.
    # |

    'auto_install': False,
}
A Couple Sample Models
We have an extremely creative, and definitely unique (no one has used Twitter for their development tutorial before, right?) set of models to mess around with.
The first is a Twitter settings model. This is going to be a class that stores a username and a password. These would be credentials for accessing Twitter accounts if this module was expanding out to a functioning module.
# -*- coding: utf-8 -*-
from odoo import _, api, fields, models


class TwitterSettings(models.Model):
    _name = 'twitter.settings'

    username = fields.Char(string='Username')
    password = fields.Char(string='Password')
    connected = fields.Boolean(string='Connected', default=False)

    def connect(self):
        """
        Attempt to connect to Twitter.
        """
        self.ensure_one()
        self.update({'connected': True, })
The second is a Tweet model. This is a data model that contains the description of the tweet, and constraints for the tweet. For example, you cannot generate a tweet that is longer than 140 character.
This gives us a clear restriction where we can write some tests to ensure that restriction is being enforced by the system.
# -*- coding: utf-8 -*-
from odoo import _, api, fields, models
from odoo.exceptions import ValidationError


class Tweet(models.Model):
    _name = 'twitter.tweet'
    _rec_name = 'description'

    description = fields.Text(string='Description', size=140, required=True)

    @api.constrains('description')
    def constrain_description(self):
        """
        Raises a ValidationError if tweets are longer than 140 characters.
        """
        if self and len(self.description) > 140:
            raise ValidationError('Tweets cannot be longer than 140 characters.')
A Couple Sample Helpers
Now we need 2 helpers. We have the Twitter data models, but we need an easy way to make a tweet and an easy way to truncate off characters down.
So that leaves us with a string.py helper and a tweeter.py helper for our
Tweeter class.
# -*- coding: utf-8 -*-

def limit(str, size):
    """
    Truncate a string down to a certain size limit.
    In the case where the string is less than size it will
    return the string as is.
    :param str: The string to truncate.
    :param size: The max number of characters the string can be.
    :return: The size limited string.
    """
    if len(str) <= size:
        return str
    return str[0:size]
# -*- coding: utf-8 -*-

class Tweeter():
    def __init__(self, settings):
        """
        Initialize the Tweeter object.
        """
        self.settings = settings

    def tweet(self, description):
        """
        Create a tweet.
        :param description: The content of the tweet.
        :return: The generated tweet.
        """
        return self.settings.env['twitter.tweet'].create({
            'description': description, })
Writing A Test — Requirements
Alright, we got a sweet Twitter module built out now.
How do we write a test for it? First, there are some requirements specific to the Odoo testing framework that we must adhere to. You’ll see how these apply in the sample tests I’ve written, but here’s what you need to think about:
- All tests must be included in
tests/__init__.py - All tests must extend an Odoo test case class
- All tests must be put inside of the
testsdirectory in your module - All test files must start with
test_<what_your_testing>.py - All test methods must start with
def test_<what_your_testing>(self):
All Tests Must Be Included In tests/__init__.py
Even if they are nested deeper. So in the case of our sample module, we have 4 tests:
tests/unit/test_string_helper.pytests/unit/test_tweeter_helper.pytests/unit/test_twitter_settings_model.pytests/unit/test_twitter_tweet_model.py
If you look at the tests/__init__.py file then you will see the following:
# -*- coding: utf-8 -*-
from .unit import test_string_helper
from .unit import test_tweeter_helper
from .unit import test_twitter_settings_model
from .unit import test_twitter_tweet_model
Make sure to always include your test file in this __init__.py file for the system to recognize
the test.
Extend An Odoo Test Class
There are some pre-existing test classes for you to work with, but you need to extend one of them.
odoo.tests.common.TransactionCase <--- Most common
odoo.tests.common.SingleTransactionCase
odoo.tests.common.HttpCase
odoo.tests.common.SavepointCase
So your tests classes will look something like the following:
# -*- coding: utf-8 -*-
from odoo.tests import TransactionCase

class MyTest(TransactionCase):
    ...
Put Your Tests In The Tests Folder
You can get a little bit creative with your module organization, except when it comes to things like
tests, make sure they are in the tests folder.
Otherwise, the testing framework will ignore them.
test_module/tests/
├── unit
│   ├── test_tweeter_helper.py
│   ├── test_twitter_tweet_model.py
│   ├── test_string_helper.py
│   ├── test_twitter_settings_model.py
│   └── __init__.py
└── __init__.py
All Test Files Must Start With test_
As you are making your tests (and putting them in the tests folder), make sure that all of
your test files are prefixed with test_ .
There’s a reason why, in my example, that my test files are named things like test_tweeter_helper.py
or test_string_helper.py .
All Test Methods Must Start With test_
I haven’t actually shown you a full test class or method yet, but when you add methods to your test class
(which is inside of the tests folder and inside of a file prepended with
tests_<filename>.py) then you also have to prefix it with test_ .
I know it’s feeling a little overkill, but this is the last test_ you will need.
# -*- coding: utf-8 -*-
from odoo.tests import TransactionCase
class MyTest(TransactionCase):
    def test_should_evaluate_true(self):  <----
        ...
Writing A Test — Examples
Now you know those 5 requirements above for actually writing a test.
Here’s what one looks like:
# -*- coding: utf-8 -*-
from odoo.tests import TransactionCase
from odoo.addons.test_module.helpers import string


class StringHelperTest(TransactionCase):
    def test_string_should_truncate_when_greater(self):
        self.assertEqual(len(string.limit('A short string...', size=5)), 5)

    def test_string_should_do_nothing_when_same_size(self):
        sample_str = 'This is my sample string.'
        sample_str_len = len(sample_str)
        self.assertEqual(len(string.limit(sample_str, sample_str_len)), sample_str_len)

    def test_string_should_do_nothing_when_less_than(self):
        sample_str = 'Another cool sample string!'
        sample_str_len = len(sample_str)
        self.assertEqual(len(string.limit(sample_str, sample_str_len)), sample_str_len)
This is our unit test for the string helper. So this is under tests/unit/test_string_helper.py
and is testing our helper at helpers/string.py .
I’m not going to dig too far into what you should be trying to test for or all of the assertion method
available to you (check out the list of assertion methods for unittest2
or the odoo/test/common.py file in Odoo core.)
Hopefully, you can get a general idea from the example above for how to write some sample test methods.
I wrote 3 methods in that example above:
- Does our string helper properly truncate a string when the string is longer than the size limit?
- Does our string helper do nothing when the string is exactly the size limit?
- Does our string helper do nothing when the string is less than the size limit?
To do this, I need to import our string helper from the module via a from odoo.addons.test_module.helpers import string
call, create some sample strings to work with, call the string.limit(...) function that I’m trying
to test, and then assert that the return values are equal to the expected results.
def test_string_should_do_nothing_when_same_size(self):
    sample_str = 'This is my sample string.'
    sample_str_len = len(sample_str)

    self.assertEqual(
        # Actual results from function call...
        len(string.limit(sample_str, sample_str_len)),
        # Expected results from the function call...
        sample_str_len
    )
Make sure to check out the other 3 test classes that I wrote as well for some more example tests:
Running Tests
Finally, we can try to run some tests. I’m going to show you how to run these via Docker and Docker
Compose, but you can also run these directly from the odoo.py or
odoo-bin executables.
Requirements
More requirements.
Similar to the requirements for writing a test. There are a few things that we need for running the test suite.
- A database instance WITH demo data. So when you are creating a database from that database creation screen, make sure to mark to include demo data.
- Run odoo with the
--test-enableflag. - Run odoo with the
-d {my_databaseflag. - Run odoo with the
-i {modules_to_install}flag. - (optional) Sometimes it’s also nice to use
--stop-after-init.
Run The Tests
With Docker
1. Clone down the sample project
$ git clone https://github.com/holdenrehg/sample_test_module.git
$ cd sample_test_module
2. Start up the instance and create a new database called test_1
with demo data. If you do not make your database first, the command in step #3 will
automatically create the database but also run tests on core modules (this can take a while).
$ docker-compose up -d
3. Stop your instance and then re-run the container with the proper arguments for testing.
$ docker-compose stop
$ docker-compose run web \
    --test-enable \
    --stop-after-init \
    -d test_1 \
    -i test_module
Without Docker
If you are running your own local instance:
1. Clone down the sample project and move the addon into your addons directory.
$ git clone https://github.com/holdenrehg/sample_test_module.git
$ mv sample_test_module/test_module {my_project/my_addons/}
2. Make a database called test_1 with demo data. If you do not make your
database first, the command in step #3 will automatically create the database but also run tests on core
modules (this can take a while).
3. Run your odoo instance with the proper arguments for testing.
$ odoo.py \
      --test-enable \
      --stop-after-init \
      -d test_1 \
      -i test_module
Test Results
Good Results
If everything runs successfully then you will see the following in the log:
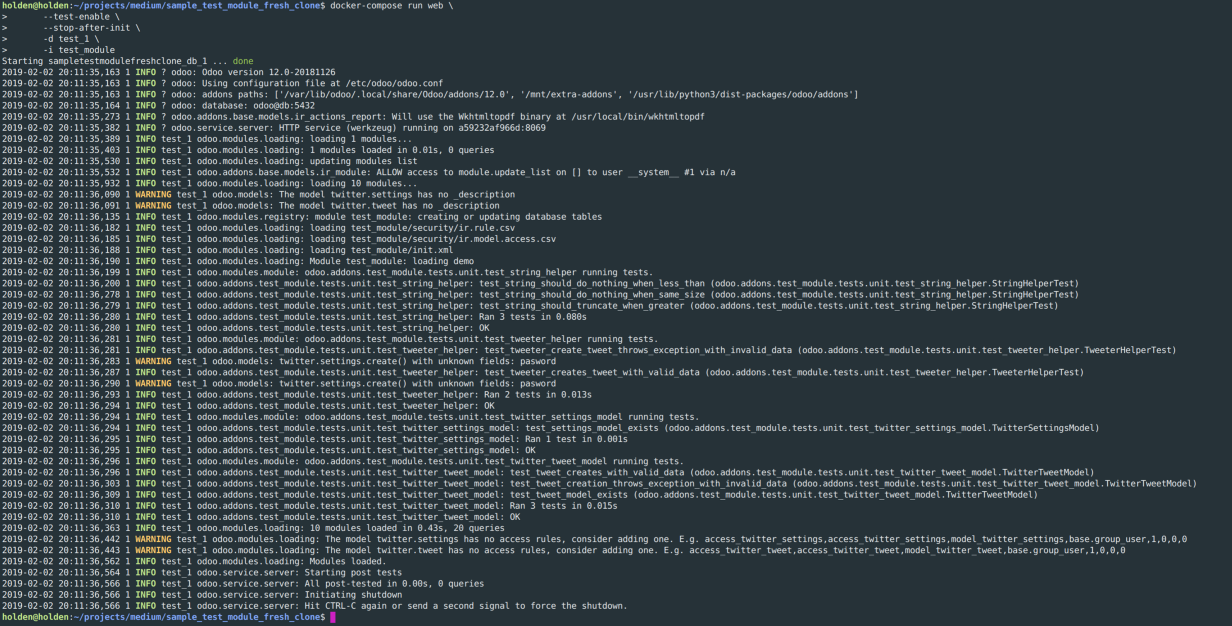
It gives you a lot of information to parse, but you will be looking for each section that says something
similar toodoo.addons.test_module.tests.unit.test_string_helper running test because that will
be an individual test class/test case. You can see where it runs each method in the test case.
Example Results For String Helper Tests
2019-02-02 20:11:36,199 1 INFO test_1 odoo.modules.module: odoo.addons.test_module.tests.unit.test_string_helper running tests.
2019-02-02 20:11:36,200 1 INFO test_1 odoo.addons.test_module.tests.unit.test_string_helper: test_string_should_do_nothing_when_less_than (odoo.addons.test_module.tests.unit.test_string_helper.StringHelperTest)
2019-02-02 20:11:36,278 1 INFO test_1 odoo.addons.test_module.tests.unit.test_string_helper: test_string_should_do_nothing_when_same_size (odoo.addons.test_module.tests.unit.test_string_helper.StringHelperTest)
2019-02-02 20:11:36,279 1 INFO test_1 odoo.addons.test_module.tests.unit.test_string_helper: test_string_should_truncate_when_greater (odoo.addons.test_module.tests.unit.test_string_helper.StringHelperTest)
2019-02-02 20:11:36,280 1 INFO test_1 odoo.addons.test_module.tests.unit.test_string_helper: Ran 3 tests in 0.080s
2019-02-02 20:11:36,280 1 INFO test_1 odoo.addons.test_module.tests.unit.test_string_helper: OK
Bad Results
All the tests don’t pass all the time, so let’s check out our log for a failing test.
You’ll see where again we get the logger for odoo.addons.test_module.tests.unit.test_string_helper running tests and then each method that runs below it.
In this scenario (where I forced a method to fail) we can see a stack trace with the problem:
FAIL: test_string_should_truncate_when_greater (odoo.addons.test_module.tests.unit.test_string_helper.StringHelperTest)
Traceback (most recent call last):
   File "/mnt/extra-addons/test_module/tests/unit/test_string_helper.py", line 8, in test_string_should_truncate_when_greater
     self.assertEqual(len(string.limit('A short string...', size=6)), 5)
 AssertionError: 6 != 5
Pretty clear that our string.limit method ran with size=6 but we were expecting the
length of the final string to be equal to 5. This looks like a problem with our test instead of the functionality
of the method, so we can fix that and re-run our test suite.
Conclusion
There’s a little bit of an additional learning curve testing in Odoo, especially if you are used to working on a vanilla python project with tools like pytest or unittest2.
But if you are an Odoo developer day-to-day it’s worth it.
Write more tests.
Then write even more tests.
They can save your ass in the long run especially as your testing suite builds up and provides more and more coverage of your project.
Thanks For Reading
I appreciate you taking the time to read any of my articles. I hope it has helped you out in some way. If you're looking for more ramblings, take a look at theentire catalog of articles I've written. Give me a follow on Twitter or Github to see what else I've got going on. Feel free to reach out if you want to talk!